|
Building an Annotation and XML Configured Project
This is the last section of the "Introduction to Spring". In this section the project from the previous section is modified to use both annotations and an xml configuration file. This is currently the most common way Spring applications are developed.
Make a Copy of the Annotations Project
The general idea of this project is to take the previous, pure annotation project, and replace the @Configuration class with an xml configuration file. Hence the first steps are to:
- Create a new java project called SpringConsoleHybrid
- Copy the contents of the src folder to this new project
- Copy the contents of the res folder to this new project
- Copy the contents of the lib folder to this new project
- Open the project properties dialog, java build path tab:
- Add the res folder to the project's source path
- Ensure the project's src folder is on the source path
- Add the jars in the lib folder to the project's libraries
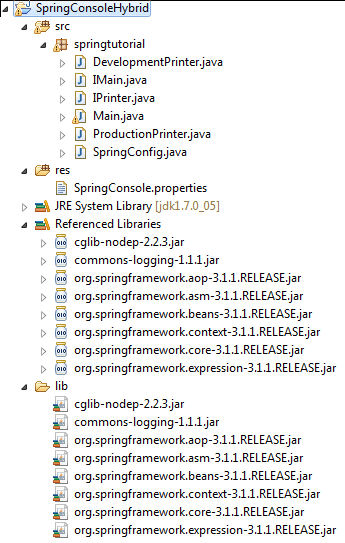
At this point the project's tree should compile with no errors, and appear as shown below:
Create The XML Configuration File
In the res folder, a new file called mainSpringContext.xml is created as shown below:
mainSpringContext.xml
<?xml version="1.0" encoding="UTF-8"?>
<beans
 xmlns="http://www.springframework.org/schema/beans"
 xmlns:context="http://www.springframework.org/schema/context"
 xmlns:xsi="http://www.w3.org/2001/XMLSchema-instance"
 xsi:schemaLocation="
   http://www.springframework.org/schema/beans
   http://www.springframework.org/schema/beans/spring-beans-3.1.xsd
   http://www.springframework.org/schema/context
   http://www.springframework.org/schema/context/spring-context-3.1.xsd
 ">
 <context:annotation-config/>
 <context:property-placeholder location="classpath:SpringConsole.properties"/>
 <context:component-scan base-package="springtutorial"/>
 <alias alias="print" name="${printer}"/>

 <bean id="mainApp" class="springtutorial.Main">
   <property name="springWiredProperty"
     value="This value is defined in the Spring Context"/>
 </bean>
</beans> |
- context:annotation-config is used to inform Spring that the beans use Spring annotations.
- context:property-placeholder requests that Spring loads a property file called SpringConsole.properties, from the classpath.
- context:component-scan is used to request that Spring scans the classes in the packages mentioned for Spring annotated beans.
- alias defines an alias bean for outputting text to the console. The properties file specifies exactly which implementation of IPrinter to use.
- bean is used to define one Spring bean, called mainApp. A property value is injected for springWiredProperty
The above file does exactly what SpringConfig.java does, so SpringConfig.java is deleted from this project.
Edit Main.java
The Main.jaja file is edited to be as shown below:
Main.java
package springtutorial;

import org.springframework.beans.factory.annotation.Autowired;
import org.springframework.beans.factory.annotation.Qualifier;
import org.springframework.context.ApplicationContext;
import org.springframework.context.support.ClassPathXmlApplicationContext;
import org.springframework.stereotype.Service;

@Service
public class Main implements IMain {
	private String springWiredProperty;
	private @Autowired @Qualifier("print") IPrinter print;
	private @Autowired ApplicationContext ctx;
	// Lists the files in which Spring beans are defined:
	private static final String[] SpringConfigLocations =
		{"mainSpringContext.xml"};

	public static void main(String[] args) {
		ClassPathXmlApplicationContext context = new ClassPathXmlApplicationContext(SpringConfigLocations);
		IMain mainApp = (IMain) context.getBean("mainApp");
		mainApp.go();
	}

	@Override
	public void go() {
		print.print("It works " + springWiredProperty);
		print.print("a second line");

		IPrinter print2 = (IPrinter) ctx.getBean("print");
		print2.print("print from second printer bean");
	}

	public String getSpringWiredProperty() {
		return springWiredProperty;
	}

	public void setSpringWiredProperty(String springWiredProperty) {
		this.springWiredProperty = springWiredProperty;
	}
}
|
- @Qualifier("print") is added to formally state that it is the Spring bean called print that is wanted.
- SpringConfigLocations is used to hold the filename of the Spring configuration file to use.
-
In the application's launch (main() method), a ClassPathXmlApplicationContext is created, with the xml configuration file to use.
The application is run, and the console displays the following:
Development[0]: It works This value is defined in the Spring Context
Development[1]: a second line
Development[0]: print from second printer bean
|
The source code for this project can be found here.
Conclusion
That wraps it up for the introduction to Spring. Hopefully there is enough here to help novices get started with Spring.
There are many sources of information for Spring, www.springsource.org is the starting point for further information.
|